
Web scraping isn’t new. However, the technologies and techniques that are used to power websites are developing at a rapid speed. A lot of websites use front-end frameworks like Vuejs, react, or angular, that load (partial) content asynchronously via javascript. Hence, this content can only be fetched if the page is opened in a web browser. This is where Node.js comes in.
In this article, we’re going to illustrate how to perform web scraping with JavaScript and Node.js by rendering a static page and scraping desired content. Next, we’ll cover how to use a headless browser, Puppeteer, to retrieve data from a dynamic website that loads content via javascript.
If you prefer video content, we have also created a video tutorial that covers the fundamentals of Node.js & Puppeteer Web Scraping:
What you’ll need
- Web browser
- A web page to extract data from
- Code editor such as Visual Studio Code
- Node.js
- Axios
- A parser (JSdom or Cheerio)
- Puppeteer
Ready? Let’s begin getting our hands dirty…
Getting Started
Installing Node.js
Node.js is a popular JavaScript runtime environment that comes with lots of features for automating the laborious task of gathering data from websites.
To install it on your system, follow the download instructions available on its website here. npm (the Node Package Manager) will also be installed automatically alongside Node.js.
npm is the default package management tool for Node.js. Since we’ll be using packages to simplify web scraping, npm will make the process of consuming them fast and painless.
Next, go to your project’s root directory and run the following command to create a package.json file, which will contain all the details relevant to the project:
npm initInstalling Axios
Axios is a robust promise-based HTTP client that can be deployed both in Node.js and the web browser. With this npm package, you can make HTTP requests from Node.js using promises, and download data from the Internet easily and fast.
Furthermore, Axios automatically transforms data into JSON format, intercepts requests and responses, and can handle multiple concurrent requests.
To install it, navigate to your project’s directory folder in the terminal, and run the following command:
npm install axiosBy default, NPM will install Axios in a folder named node_modules, which will be automatically created in your project’s directory.
Installing cheerio vs. jsdom

Cheerio is an efficient and lean module that provides a jQuery-like syntax for manipulating the content of web pages. In other words, it greatly simplifies the process of selecting, editing, and viewing DOM elements on a web page. While Cheerio allows you to parse and manipulate the DOM easily, it does not work the same way as a web browser. This implies that it doesn’t take requests, execute JavaScript, load external resources, or apply CSS styling.
Alternatively, we can choose to work with jsdom, which is a very popular DOMParser interface. This is recommended when working with more complex data structures.
In this tutorial, we will stick with cheerio. To install it, navigate to your project’s directory folder in the terminal, and run the following command:
npm install cheerio By default, just like Axios, npm will install Cheerio in a folder named node_modules, which will be automatically created in your project’s directory.
Installing Puppeteer
We will not need Puppeteer for scraping a static website, but since we will need it later when we move towards dynamic website, we install it now anyway.
Puppeteer is a Node library that allows you to control a headless Chrome browser programmatically and extract data smoothly and fast.
Since some websites rely on JavaScript to load their content, using an HTTP-based tool like Axios may not yield the intended results. With Puppeteer, you can simulate the browser environment, execute JavaScript just like a browser does, and scrape dynamic content from websites.
To install it, just like the other packages, navigate to your project’s directory folder in the terminal, and run the following command:
npm install puppeteerScraping a simple website
Now let’s see how we can use Axios and Cheerio to extract data from a simple website.
For this tutorial, our target will be this web page. We’ll be seeking to extract the number of comments listed on the top section of the page.
To find the specific HTML elements that hold the data we are looking for, let’s use the inspector tool on our web browser:

As you can see on the image above, the number of comments data is enclosed in an <a> tag, which is a child of the <span> tag with a class of comment-bubble. We’ll use this information when using Cheerio to select these elements on the page.
Here are the steps for creating the scraping logic:
1. Let’s start by creating a file called index.js that will contain the programming logic for retrieving data from the web page.
2. Then, let’s use the require function, which is built-in within Node.js, to include the modules we’ll use in the project.
const axios = require('axios');
const cheerio = require('cheerio');3. Let’s use Axios to make a GET HTTP request to the target web page.
Here is the code:
Notice that when a request is sent to the web page, it returns a response. This Axios response object is made up of various components, including data that refers to the payload returned from the server.
So, when a GET request is made, we output the data from the response, which is in HTML format.
Parsing HTML
4. Next, let’s load the response data into a Cheerio instance. This way, we can create a Cheerio object to help us in parsing through the HTML from the target web page and finding the DOM elements for the data we want—just like when using jQuery.
To uphold the infamous jQuery convention, we’ll name the Cheerio object $.
Here is the code:
const $ = cheerio.load(html);5. Let’s use the Cheerio’s selectors syntax to search the elements containing the data we want:
const scrapedata = $('a', '.comment-bubble').text()
console.log(scrapedata);
Notice that we also used the text() method to output the data in a text format.
6. Finally, let’s log any errors experienced during the scraping process.
.catch( error => {
   console.log(error);
});
Here is the entire code for the scraping logic:
If we run the above code with the node index.js command, it returns the information we wanted to scrape from the target web page.
Here is a screenshot of the results:
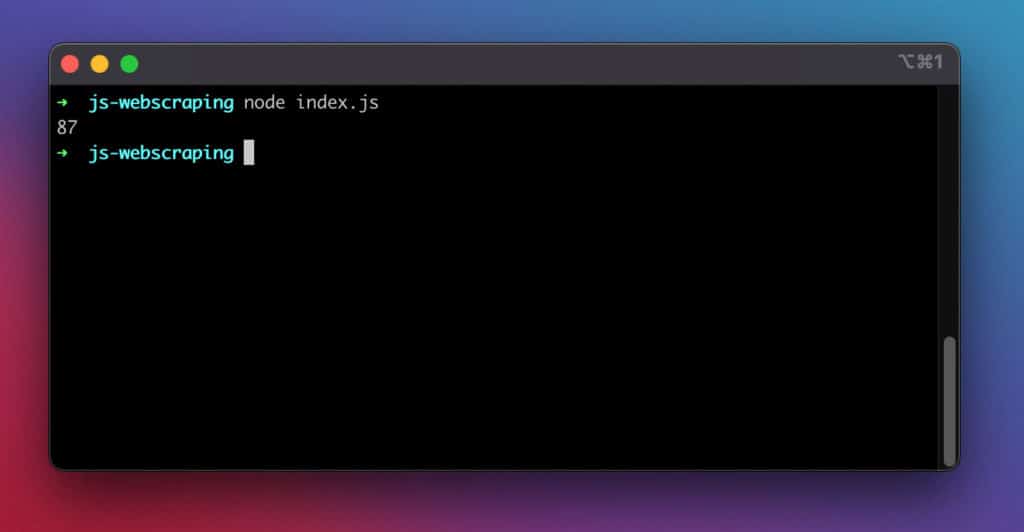
It worked!
Scraping a dynamic website
Now let’s see how you can use Puppeteer to extract data from a dynamic website.
async / await
For this example, we’ll use the ES2017 asynchronous async/await syntax to work with promises comfortably. Its release brought asynchronous code much closer to the style of synchronous code.
The async the expression implies that a promise will be returned. And the await expression makes JavaScript wait until that promise is resolved before executing the rest of the code. This syntax will ensure we extract the web page’s content after it has been successfully loaded.
Our target will be this Reddit page, which uses JavaScript for rendering content. We’ll be seeking to extract the headlines and descriptions found on the page.
To find the specific HTML elements that hold the data we are looking for, let’s use the inspector tool on our web browser:
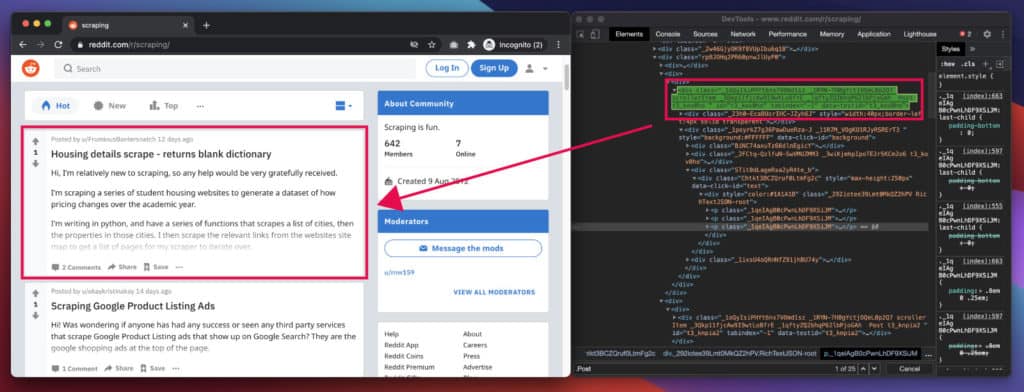
As you can see in the image above, each post is enclosed in a Post class, amongst other stuff. By examining it closely, we find that each post title has an h3 tag, and each description has a p tag. We’ll use this information when selecting these elements on the page.
The Basics – Starting Puppeteer
Let’s start by creating a file called index.js that will contain the programming logic for retrieving data from the webpage.
Then, let’s use the require function, which is built-in within Node.js, to import Puppeteer into our project.
const puppeteer = require ('puppeteer');After that, let’s launch Puppeteer. We’re actually launching an instance of the Chrome browser to use for accessing the target webpage.
puppeteer.launch()In addition, let’s create a new page in the headless browser. Since we’ve used the await expression, we’ll wait for the new page to be opened before saving it to the page variable.
Next, after creating the page, we’ll use it for navigating to the Reddit page. Again, since we’ve used await, our code execution will pause until the page is loaded or an error is thrown.
We’ll also wait for the page’s body tag to be loaded before proceeding with the rest of the execution.
Here is the code:
.then (async browser => {
const page = await browser.newPage ();
await page.goto ('https://www.reddit.com/r/scraping/');
await page.waitForSelector ('body');
Now, after pulling up the Reddit page in Puppeteer, we can use its evaluate() function to interact with the page.
With the function, we can execute arbitrary JavaScript in Chrome and use its built-in functions, such as querySelector(), to manipulate the page and retrieve its contents.
Here is the code:
After that, let’s close the browser.
await browser.close ();Finally, let’s log any errors experienced during the scraping process.
.catch (function (err) {
    console.error (err);
});
Complete Scraping Snippet
Finally, let us run the node index.js command. It returns the information we wanted to scrape from the target web page.
This is a screenshot of the results:
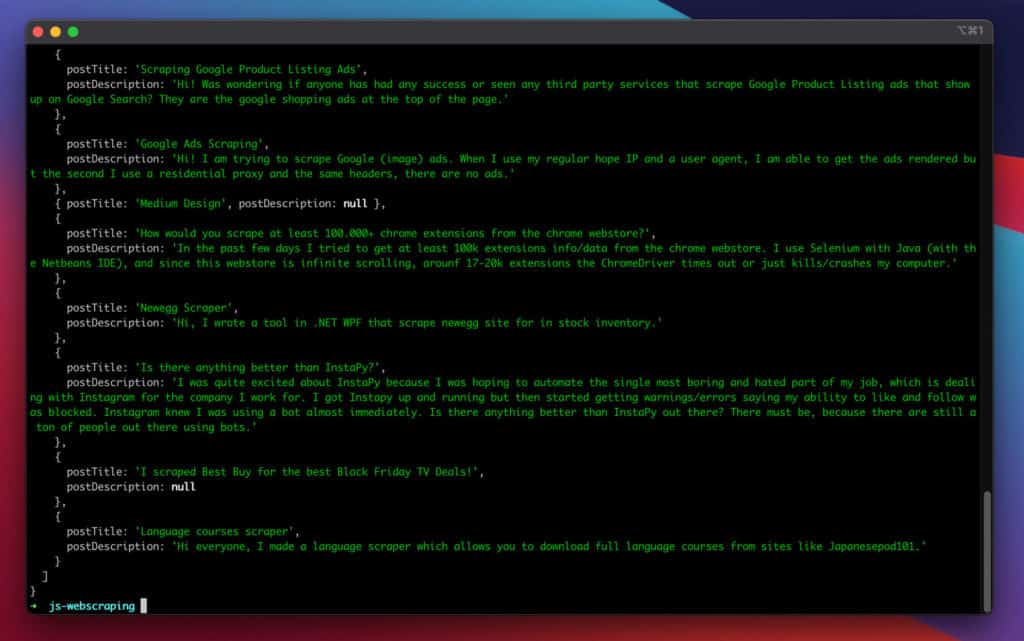
Great, it worked!
Further improvements
Adding proxies
If you intend to use the above in production and scrape at the larger scale of requests, rotating your IP addresses after every few requests can help you to stay below their radar and extract content successfully.
Check out our tutorial: How to build a proxy rotator in Node.js
Therefore, connecting to a proxy service can help you to make the most of your scraping efforts. Importantly, with residential proxies, you can get around the scraping bottlenecks and harvest online data easily and fast.
In Puppeteer, you can easily connect to a proxy by adding one extra line of arguments when launching it:
puppeteer.launch({
    args: [ '--proxy-server=145.0.10.11:7866' ]
});
Handling Infinite Scroll
Some pages feature infinite scrolling. By scrolling a certain amount of times towards the bottom, you can unlock more elements to be visible. You can easily achieve this by adding the following snippet to the code:
for (let j = 0; j < 5; j++) {
  await page.evaluate('window.scrollTo(0,   document.body.scrollHeight)');
  await page.waitFor(1000);
}
Conclusion
In conclusion, that’s how you can perform web scraping with JavaScript and Node.js. With such skills, you can harvest useful information from web pages and integrate them into your use case.
Finally, remember that if you want to build something advanced, you can always check Axios, Cheerio, and Puppeteer documentation to assist you in getting your feet off the ground quickly.
Happy scraping!